

If your games stutter, your frame rate drops in busy scenes, or your graphics card never seems fully loaded, the problem may not be a part you need to replace. In many cases, bios settings reduce cpu bottleneck problems for free, because the hardware you already own is running below its rated speed or with limits that hold it back. Your BIOS, also called UEFI firmware on modern PCs, controls memory speed, CPU boost behavior, power limits, and how the CPU talks to the graphics card. Change the right settings, in the right order, and you can remove hidden limits that make a capable CPU look slow.
This guide covers five settings in depth: XMP or EXPO memory profiles, Resizable BAR, Precision Boost Overdrive and its Intel equivalent, CPU power limits and performance mode, and C-State control. For each setting you will learn what it does, how it affects CPU bottlenecks, the step by step path to enable it, and when to leave it alone. Nothing here promises a specific FPS gain, because gains depend on your CPU, graphics card, resolution, game, and cooling. The honest goal is to stop your system from leaving free performance on the table, then measure the result in your own games.
Before you change anything, read the safety section near the end of this guide. BIOS changes are usually reversible, but a bad combination can stop a PC from booting until you reset the firmware. Change one setting at a time, test, and write down what you changed. That simple habit turns guesswork into real tuning.
Why BIOS Settings Matter for a CPU Bottleneck
A CPU bottleneck happens when the processor cannot prepare frames fast enough for the graphics card. That is most visible at 1080p, in CPU heavy games such as large open world titles, strategy games, simulation games, and competitive shooters at high refresh rates, and in busy scenes with many characters, physics objects, or draw calls. When the CPU is the limit, raising graphics settings often does little, because the graphics card is waiting on the CPU.
If you are not sure whether you have a CPU bottleneck, start by checking the basics before you open the BIOS. Our guide to what counts as a good bottleneck percentage explains how to read bottleneck results without overreacting to a single number, and our CPU bottleneck calculator can help you compare a CPU and GPU pairing. For a hands on diagnosis, follow how to find a PC bottleneck and check whether your games are CPU intensive or GPU intensive.
BIOS settings matter because several CPU limits are set in firmware, not in Windows. Memory may run at a slow default speed even though you bought fast RAM. The CPU may be capped by a conservative power limit set by the motherboard maker. The CPU may only access a small slice of graphics card memory at a time. Each of these limits adds latency or reduces throughput in the exact path a bottlenecked CPU uses most: feeding data to the game engine and to the graphics card.
It is also important to know what BIOS settings cannot fix. No firmware toggle turns a weak, old CPU into a modern high end processor. No setting fixes a graphics card that is overheating, a power supply that cannot deliver stable power, or a game that is poorly optimized. If your power supply is suspect, check the warning signs in is your PSU bottlenecking your PC before you push power limits higher. And if you are chasing a perfect system, read can you build a zero bottleneck PC for a realistic view of why some limit always exists somewhere.
Settings at a Glance
Use this table as a checklist, not as a list to enable blindly. Check support, cooling, and stability for each row before you change it.
| Setting | What it changes | Best for | Main risk if misused |
|---|---|---|---|
| XMP or EXPO memory profile | Memory speed, timings, and voltage | Almost every gaming PC with rated RAM above the default speed | Boot failure or crashes if the kit or board cannot run the profile |
| Resizable BAR (ReBAR) | CPU access to full graphics card memory | Modern CPU, board, and GPU combinations | Black screen or boot trouble on unsupported or outdated firmware |
| Precision Boost Overdrive (PBO) | AMD CPU power and current headroom for boost | AMD Ryzen PCs with good cooling | More heat and power draw, little gain if already thermally limited |
| CPU power limits and performance mode | How long and how high a CPU can boost | PCs capped by conservative board defaults | Higher temperatures and power draw, possible throttling if cooling is weak |
| C-State control | CPU low power idle states and wake latency | Competitive or latency sensitive players, used with care | Higher idle power and heat if deep states are disabled |
Enable XMP or EXPO for Your Memory
XMP/EXPO: What XMP and EXPO do
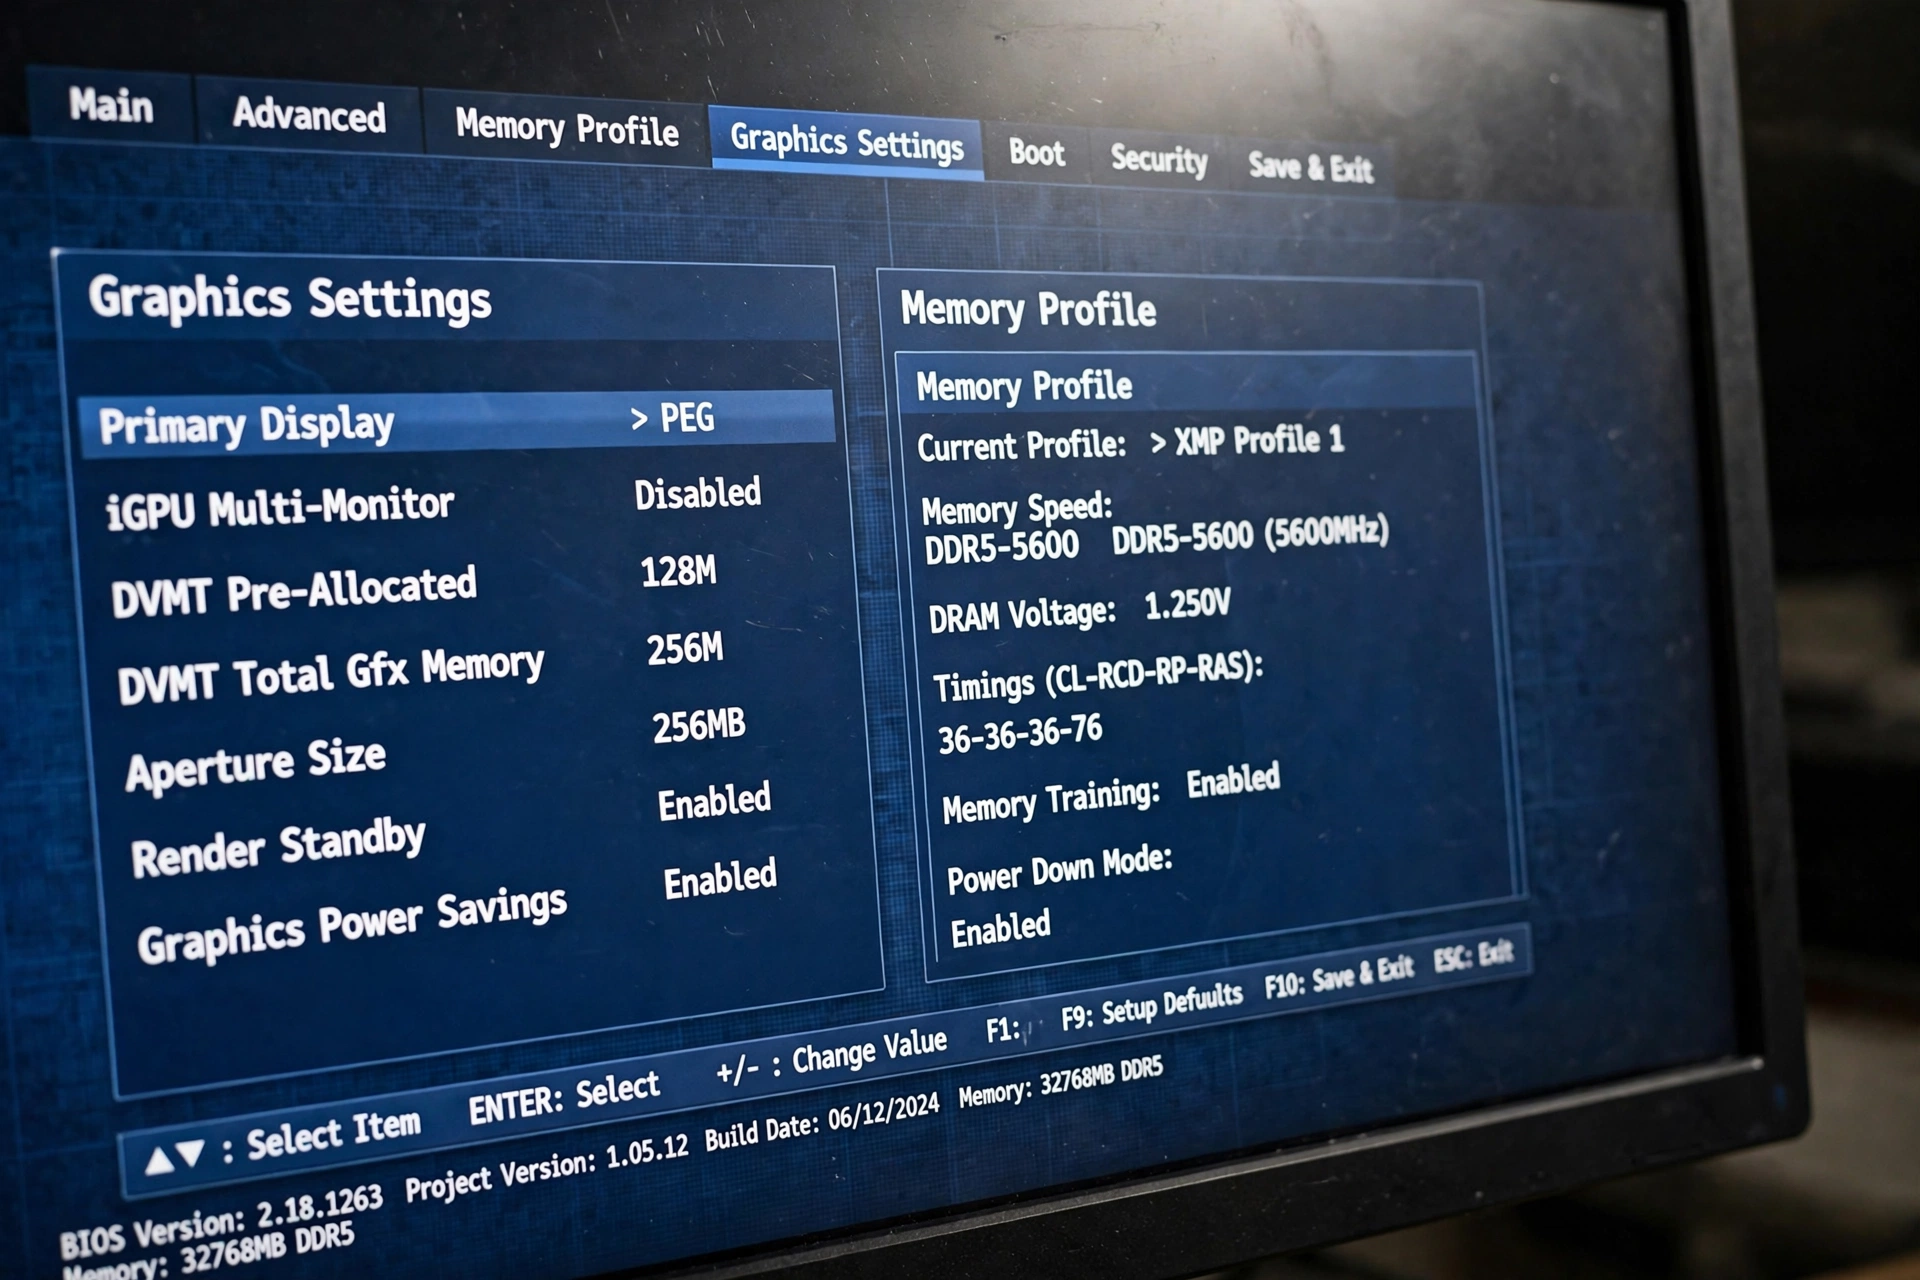
Memory sold as DDR4-3600 or DDR5-6000, for example, does not always run at that speed out of the box. For compatibility, a motherboard usually starts memory at a slower standard speed defined by JEDEC, the memory standards body. XMP, short for Extreme Memory Profile on Intel platforms, and EXPO, short for Extended Profiles for Overclocking on AMD platforms, are profiles stored on the memory sticks themselves. Enabling a profile tells the board to use the speed, timings, and voltage the kit was rated for.
Intel describes XMP as a way to overclock compatible DDR4 or DDR5 memory beyond standard settings using pre-tested profiles, as explained in Intel XMP memory profiles. On AMD boards you may see the same idea labeled EXPO, DOCP on some ASUS boards, or A-XMP on some MSI boards. The name changes, but the job is the same: run the RAM at its advertised profile instead of the slow default.
XMP/EXPO: How it affects CPU bottlenecks
Memory speed affects how fast the CPU can fetch game data, textures, and instructions. When the CPU is already the limit, slow memory makes the wait longer. Faster memory with tighter effective latency can improve frame pacing, raise minimum frame rates, and reduce stutter in CPU heavy scenes. This is why an XMP check is the first step in almost every BIOS tuning guide, and why a PC can feel CPU limited even when the processor itself is decent.
The effect is largest when three conditions line up: you are playing at 1080p or at a high refresh rate, the game is CPU heavy, and your memory is currently running well below its rated speed. At 4K with maximum graphics settings, the graphics card is usually the limit, so memory speed matters less. That does not make XMP useless at 4K, it just means you should not expect it to fix a graphics card limit.
Single channel memory is a related trap. One stick, or two sticks in the wrong slots, cuts memory bandwidth compared with a matched pair in dual channel slots. XMP helps, but it does not replace dual channel. Check your motherboard manual for the correct slots, usually labeled A2 and B2, before you judge any memory setting.
XMP/EXPO: Step by step enable path
- Restart the PC and press Delete or F2 repeatedly during startup to enter BIOS or UEFI setup. Some laptops use a different key, so check the startup screen or the manual.
- Look for an easy mode or main screen option labeled XMP, EXPO, DOCP, or Memory Profile. On many boards it is near the top of the screen.
- Select Profile 1, which is usually the rated profile for your kit. If two profiles exist, start with the first and test before trying the second.
- If you are in advanced mode, the same option is often under AI Tweaker, Overclocking, or DRAM settings, depending on the board maker.
- Press F10 to save and exit, then let Windows boot normally.
- Verify the speed in Windows with Task Manager, under Performance and Memory, or with a free tool such as CPU-Z. The reported speed should now match, or come close to, the rated speed on the box.
XMP/EXPO: Risks and when to leave it alone
XMP and EXPO are technically a form of overclocking, even though the profile is pre-tested by the memory maker. That means stability is not guaranteed on every combination of CPU, board, and kit. Common problems include failure to boot, blue screens, game crashes, or memory errors under load. Four memory sticks are harder to run at high speed than two, and very high speed DDR5 kits can be harder still on some boards.
If your PC becomes unstable after enabling a profile, do not keep pushing. Go back into the BIOS, disable the profile, and boot at the default speed to confirm stability returns. Then try one of these safer steps, one at a time: update the BIOS to a version that improves memory compatibility, try the second profile if one exists, or set the memory speed one step below the rated profile manually. If none of those steps work, leave the default speed in place. Stable slower memory beats fast memory that crashes in the middle of a match.
Also leave XMP alone if you do not know your kit’s rated speed, if the PC is a work machine you cannot afford to destabilize, or if you have already seen memory related crashes. In that case, stability is worth more than a small gain.
Enable Resizable BAR
Resizable BAR: What Resizable BAR does
Normally, the CPU accesses graphics card memory in small chunks, historically limited to 256 MB at a time. Resizable BAR, often shortened to ReBAR, removes that small window and lets the CPU access the full frame buffer at once when the game and driver support it. On AMD systems the same feature is often called Smart Access Memory. The underlying PCIe feature is the same idea, and the BIOS option may be labeled Resizable BAR, Re-Size BAR Support, or Smart Access Memory depending on the board.
NVIDIA explains that desktop Resizable BAR support requires a compatible graphics card, motherboard, and driver, and that users should verify it in the NVIDIA Control Panel after enabling it, as described in NVIDIA Resizable BAR support. That compatibility chain matters: CPU, board firmware, graphics card firmware, and driver must all support the feature, or it will not work even if the BIOS toggle is on.
Resizable BAR: How it affects CPU bottlenecks
Resizable BAR attacks a different part of the bottleneck than memory speed. It reduces the overhead of moving assets between the CPU and GPU, which can help in games that stream many textures or issue many small transfers. In supported games the result is often smoother frame delivery rather than a dramatic jump in average FPS. In unsupported games the effect may be small or absent, and in a small number of older titles it can even hurt performance, which is why you should test per game rather than assume a win.
Resizable BAR is most valuable when your graphics card has enough memory to benefit and your CPU is spending time managing transfers. It is not a substitute for a faster CPU or more graphics memory. A card with very little VRAM will not suddenly behave like a high end card, because the feature changes access, not capacity.
Resizable BAR: Step by step enable path
- Confirm Windows is booting in UEFI mode, not legacy mode. Press Windows plus R, type msinfo32, press Enter, and check that BIOS Mode says UEFI. If it says Legacy, stop here: switching modes without converting the drive can stop Windows from booting, and that is a separate job to do after a backup.
- Update the motherboard BIOS and the graphics card firmware if the maker offers a Resizable BAR update for your model. Do not install firmware meant for a different card model.
- Restart into BIOS setup with Delete or F2.
- Enable Above 4G Decoding first. This is required for Resizable BAR, and on many boards the ReBAR option only appears after Above 4G Decoding is on. You will usually find it under Advanced, PCI Subsystem, or Boot settings.
- Enable Resizable BAR, Re-Size BAR Support, or Smart Access Memory.
- Make sure CSM, short for Compatibility Support Module, is disabled if your system is in UEFI mode. CSM is a legacy compatibility layer that can block ReBAR.
- Save with F10, boot into Windows, and verify. NVIDIA users can check the NVIDIA Control Panel under System Information, where Resizable BAR should say Yes. AMD users can check the driver software or a tool such as GPU-Z.
Resizable BAR: Risks and when to leave it alone
The most common failure is a black screen after enabling ReBAR on a system with outdated firmware, an unsupported card, or a monitor connected to the wrong output. If that happens, make sure the monitor cable is plugged into the graphics card, not the motherboard video output, then reset the BIOS if needed using the method in the safety section.
Leave Resizable BAR off if any part of the chain is unsupported, if your board firmware has no such option, or if a specific game runs worse with it on. Some boards and drivers also let you control ReBAR per game, which is a better answer than leaving it off for every game because one title regressed. Test your main games individually and keep notes.
Precision Boost Overdrive and the Intel Equivalent
PBO and Intel Boost: What PBO does
Precision Boost Overdrive, or PBO, is AMD’s way of letting a Ryzen CPU boost beyond its stock power and current limits when temperature and power delivery allow it. It does not set a fixed clock speed. Instead, it raises three limits: PPT, the total package power the socket can deliver; TDC, the sustained current the board can supply; and EDC, the peak current for short bursts. With more headroom, the CPU can hold boost clocks longer and more often, provided it stays within thermal limits.
On Intel systems there is no single setting called PBO, but the idea is similar. Intel CPUs use Turbo Boost to raise clocks above base speed when power, current, and temperature allow it, and many boards add their own enhancement, often labeled Multicore Enhancement, or MCE, or an equivalent performance preset. These board presets may ignore Intel’s default power behavior to hold boost clocks on all cores. That can raise multicore performance, but it also raises power draw and heat a lot, so it is not a free setting.
A useful community discussion of doing X3D, EXPO, and PBO safely and correctly is available in the Tom’s Hardware PBO safety discussion, which stresses checking cooling and stability rather than copying someone else’s numbers. That warning applies to every CPU in this section: the right PBO or boost setting depends on your cooler, board power delivery, and exact CPU sample.
PBO and Intel Boost: How it affects CPU bottlenecks
PBO helps a CPU bottleneck only when the CPU has thermal headroom to use. If your CPU already hits its temperature ceiling at stock settings, raising power limits will mostly raise temperature, not speed, because the boost algorithm will still throttle at the thermal limit. If your CPU has cooling headroom and is power limited, PBO can help it sustain higher clocks in CPU heavy scenes, which can improve frame pacing and minimum frame rates.
For Ryzen X3D chips, such as the 7800X3D and 9800X3D, the story is different and worth special care. These chips are designed around a large cache and already deliver strong gaming performance at modest clocks, and they are more sensitive to voltage than standard Ryzen chips. Do not apply aggressive manual overclocks or high voltage settings copied from a non X3D guide. If you own an X3D chip, the safest path is usually EXPO plus Resizable BAR, with PBO left at Auto or Enabled only if your board maker and AMD guidance for that exact chip support it, and with temperatures monitored closely.
Step by step enable path for AMD
- Enter BIOS setup and switch to advanced mode if needed, often with F7.
- Find Precision Boost Overdrive under Advanced, AMD Overclocking, or AI Tweaker, depending on the board maker.
- Set PBO to Enabled for a simple start, or Advanced if you want to see PPT, TDC, and EDC limits.
- Leave Curve Optimizer alone on your first pass. It is an advanced per core voltage tuning tool, and a bad value can cause crashes that are hard to trace.
- Save with F10, boot, and monitor temperature and clock speed under a game or a short stress test. If temperatures stay within the CPU maker’s safe range and the system is stable, keep the setting. If not, return PBO to Auto.
Step by step notes for Intel
- Enter BIOS setup and look for a CPU performance preset, power limit setting, or Multicore Enhancement option. Names vary widely by board maker.
- If your board offers an Intel baseline profile and a performance profile, understand the trade: the baseline profile follows Intel power guidance more closely, while the performance profile may allow much higher sustained power.
- Do not enable a board enhancement on a stock cooler or a small case with weak airflow. The extra heat can cause throttling that makes performance worse, not better.
- Save, test with a game, and watch temperatures. If the CPU throttles quickly or the fans become extremely loud, revert to the previous profile.
PBO and Intel Boost: Risks and when to leave it alone
PBO and board boost enhancements raise power draw, heat, fan noise, and in some cases voltage. They can also void warranty coverage for overclocking in some cases, so check the CPU maker’s terms if that matters to you. The risk is highest on weak coolers, budget boards with weak power delivery, small cases, laptops, and prebuilt PCs where the cooler was sized for stock power only.
Leave PBO and Intel boost enhancements alone if your CPU already runs hot, if you value quiet operation over a small gain, if you own an X3D chip and are unsure about safe settings, or if your system is stable and you do not want to retest everything. Stock Precision Boost and Turbo Boost already do a good job for most gamers. PBO is a tuning step, not a required step.
CPU Power Limits and Performance Mode
Power Limits: What power limits do
Every modern CPU has power limits that decide how much power it can draw, and for how long. Intel systems commonly use PL1, the sustained power limit, and PL2, the short burst power limit, plus a Tau time window for how long the burst can last. AMD systems use PPT, TDC, and EDC, as described in the PBO section. Motherboard makers also add presets with names such as Performance, Balanced, Silent, or Eco Mode. These presets change the same underlying limits, just with friendlier labels.
In simple terms, a low power limit tells a fast CPU to act like a slower one under sustained load. A high limit lets it boost longer, but only if cooling can remove the extra heat. This is why two PCs with the same CPU can perform differently: one board ships with a conservative limit, the other ships with an aggressive performance preset enabled by default.
Power Limits: How it affects CPU bottlenecks
Power limits show up most clearly in sustained CPU heavy workloads: long gaming sessions, large multiplayer battles, simulation games, and games that keep many cores busy. A CPU that boosts high for a few seconds then drops to a much lower sustained clock will feel inconsistent. Frame time spikes and lower 1 percent lows are the symptom players notice, even if the average FPS looks acceptable.
Raising a power limit, or switching from Silent to Balanced or Performance mode, can smooth that behavior when cooling allows it. Lowering a power limit can also help in the opposite case: if a CPU is overheating and throttling hard, a modest limit can produce steadier clocks and smoother frames than repeated thermal throttling. This is counterintuitive, but it is real. The goal is a clock speed the cooler can actually sustain, not the highest number on a spec sheet.
Power Limits: Step by step enable path
- Enter BIOS setup and find the CPU power or performance preset. On AMD boards this is often inside the PBO menu or a separate CPU configuration page. On Intel boards it is often under CPU Power Management, Overclocking, or AI Tweaker.
- Write down the current setting before you change it. Take a phone photo of the screen if that is easier.
- If you are power limited and have good cooling, try the next step up: for example, from Silent to Balanced, or from a stock limit to the board’s Performance preset. Do not jump straight to unlimited or maximum.
- Save, boot, and test with a CPU heavy game for at least 20 to 30 minutes, watching temperature and clock speed. A short 60 second test is not enough to reveal sustained throttling.
- If temperatures stay safe and frame pacing improves, keep the change. If the CPU throttles, gets louder without a clear benefit, or crashes, step back down one level.
Power Limits: Risks and when to leave it alone
Higher power limits mean more heat, more fan noise, higher electricity use, and more stress on the board power delivery and the power supply. On a laptop, a small form factor PC, or a prebuilt with a weak cooler, raising limits can make throttling worse. On a PC that already runs cool and stable, raising limits may also do nothing, because the CPU was never power limited in the first place.
Leave power limits alone if your temperatures are already high, if your power supply is old or of unknown quality, if the PC is shared or used for work where stability matters most, or if you cannot monitor temperatures. A good rule is simple: only raise a limit you have measured as a problem. If you have not measured power throttling, you are guessing.
C-State Control and Idle Power Behavior
C-States: What C-States do
C-States are low power states a CPU enters when it is idle or lightly loaded. Deeper C-States save more power but take longer to wake from. When a game suddenly needs the CPU, the processor must exit a low power state and ramp back up to full speed. That wake latency is usually tiny, but in latency sensitive situations it can contribute to small frame time spikes.
BIOS options for this behavior appear under names such as CPU C-State, C-State Control, Package C-State Limit, or Enhanced Halt State, depending on the board. Some boards also offer a Global C-State Control option on AMD systems, and Intel boards may expose C1E and deeper package states separately. The exact menu path varies, so use your board manual rather than guessing at similarly named options.
C-States: How it affects CPU bottlenecks
For most gamers, C-States should stay enabled. Modern CPUs and Windows power plans manage idle states well, and disabling them raises idle power draw and heat for a benefit most players will never notice. The exception is a narrow one: competitive players chasing the lowest possible input latency, or users troubleshooting a specific stutter that appears when the CPU wakes from idle, may test with deeper C-States limited or disabled to see if frame pacing improves.
Even in that case, the effect is usually small compared with XMP, ReBAR, and power limits. Treat C-State tuning as a fine tuning step after the bigger settings are stable, not as a first fix for a large bottleneck. If you change C-States and see no measurable improvement, turn them back on. Free power savings and lower idle temperatures are worth keeping.
C-States: Step by step enable path
- Enter BIOS setup and find CPU C-State or Package C-State settings under Advanced CPU Configuration or Power Management.
- Write down the current setting first.
- If you are testing for latency, try limiting the package C-State to a shallower state first, rather than disabling C-States entirely. For example, move from Auto to a limit such as C6 if your board offers that choice, and test.
- Only disable C-States entirely as a short test, not as a permanent change, unless you have measured a clear benefit and accept higher idle power and heat.
- Save, boot, and test in the same game and scene you used for your baseline. If frame pacing does not improve, revert to the original setting.
C-States: Risks and when to leave it alone
Disabling C-States raises idle temperature, fan noise, and power use, and on laptops it shortens battery life noticeably. It can also mask a different problem, such as a driver issue or a background program waking the CPU, that would be better fixed directly. Leave C-States enabled if you use the PC for general work, if power cost matters, if the PC is a laptop, or if you have not measured a latency problem. Most players should never touch this setting, and that is a valid outcome.
Why Free Tweaks Matter More Right Now
Two current trends make BIOS tuning more valuable than it was a few years ago, and both are worth understanding before you spend money on new parts.
First, new games and Windows 11 features are raising the value of correct firmware settings. Windows 11 requires TPM 2.0 and Secure Boot on supported systems, and newer features such as Advanced Shader Delivery change how shaders are prepared and delivered. These are not BIOS performance toggles in the same sense as XMP or PBO, but they are a reminder to keep firmware, drivers, and Windows in a supported state. Do not disable TPM or Secure Boot to chase performance unless you understand the consequences: some newer games and anti cheat systems may refuse to run, or may warn you, on a system without them. If a game will not launch, check its requirements before you blame a BIOS performance setting.
Second, graphics card availability and pricing pressure, covered in our look at the GPU shortage in 2026, make free performance more valuable. When a new graphics card is expensive or hard to find, removing a CPU side limit you already paid for is a smarter first step than buying a part you do not yet need. BIOS tuning does not create a new graphics card, but it can delay an upgrade by making the current pairing run as well as it should. That is the right order: tune first, measure, then decide if an upgrade is still needed.
BIOS Reset, CMOS Clear and Rules That Prevent Trouble
BIOS work is low risk when you follow a few rules, and high frustration when you do not. Use this section as a checklist every time.
The golden rules
- Change one setting at a time, then boot and test. If you change five settings and the PC fails, you will not know which one caused it.
- Write down every change, with the old value and the new value. A phone photo of each BIOS screen works well.
- Do not change a setting you do not understand. Search for the exact option name plus your board model before you touch it.
- Do not update the BIOS during a storm, on an unstable power supply, or without reading the board maker’s instructions. A failed BIOS update is far more serious than a failed XMP setting.
- Keep a backup of important files before any firmware work. BIOS settings do not normally touch your files, but a boot failure at the wrong moment is stressful enough without data risk.
If the PC will not boot after a change
Do not panic. Most boards have a simple recovery path.
- Turn the PC off fully, wait a few seconds, and turn it on again. Some boards will retry with safe settings automatically after a failed boot.
- If it still will not boot, reset the BIOS to defaults. Many boards have a Clear CMOS button on the rear panel, a jumper on the board, or a BIOS reset option in the manual. Follow the manual for your exact board.
- The classic method is to power off, unplug the PC, remove the small coin cell battery on the motherboard for a few minutes, press the power button once while unplugged to discharge residual power, reinstall the battery, and boot. Only do this if you are comfortable opening the PC and you have read the manual first.
- After a reset, the PC will boot with default settings. That means XMP, ReBAR, boot order, and any custom fan curves will need to be re-entered, one at a time, with testing between changes.
- If the PC still will not boot after a reset, stop and seek help from the board maker or a local technician. Do not keep changing settings at random.
Settings to leave alone unless you know exactly why
Avoid manual CPU voltage, manual memory timings, base clock overclocking, and disabling thermal protection features unless you have a specific reason and a tested plan. These settings can damage hardware or cause crashes that look like a bottleneck but are really instability. The five settings in this guide are the high value, low risk core. Everything beyond them is advanced tuning, not a required step for a gaming PC.
Measure Frame Time Not Just Average FPS
Average FPS is a weak test for BIOS tuning, because it hides stutter. A PC can show a good average while still dropping frames in busy scenes. Frame time, the time taken to render each frame, and 1 percent lows, the slowest 1 percent of frames, tell you how smooth a game actually feels. Our guide to what frame time is and why 1 percent lows matter explains these metrics in detail, and they are the right metrics for this job.
Build a repeatable baseline
- Pick one or two games you actually play, preferably one CPU heavy game and one competitive game if you play both.
- Use the same graphics settings, resolution, and test scene every time. A built in benchmark is ideal. If a game has no benchmark, use the same route through the same area, with the same number of players or enemies if possible.
- Close background programs, browsers, downloads, and updates before each run. Background load can change results more than a BIOS setting.
- Run the test three times and record the average of the three runs. One run is noise, not data.
- Record average FPS, 1 percent lows, and a note about stutter or hitching you noticed. Tools such as MSI Afterburner with RivaTuner can show frame time and 1 percent lows on screen. Our guide to how to use MSI Afterburner covers setup and on screen display basics.
Test one change at a time
Change XMP, test, and record. Change ReBAR, test, and record. Do the same for PBO, power limits, and C-States. If a setting makes 1 percent lows worse even though average FPS rises slightly, that setting is not helping your experience. Smoothness wins over a higher average number that stutters.
Also test after a day of normal use, not just in a benchmark. A setting that passes a five minute test can still crash in a long session, after the PC warms up, or in a different game. If crashes appear after a change, revert that change first, even if benchmarks looked good.
How to read the result honestly
- If average FPS and 1 percent lows both improve, and the system stays stable for days, keep the change.
- If only average FPS improves but 1 percent lows get worse, the change may not be helping real gameplay. Revert and retest.
- If nothing changes, the setting was probably not limiting your system in that game. That is useful information, not a failure. Leave a stable, supported setting on, but do not chase further changes in that area.
- If the PC becomes unstable at any point, revert the last change. Stability is part of performance, not separate from it.
No setting in this guide should be judged by a single number from a single game. Your CPU, cooling, memory kit, graphics card, and game choice all shape the result, which is why this guide refuses to promise a specific gain. Measure your own system, and trust your own data over any headline claim.
Common Mistakes That Waste Time
Many BIOS tuning attempts fail for avoidable reasons. Watch for these traps.
First, enabling XMP but forgetting to verify it. Some boards accept the profile, then silently fall back to a slower speed after a failed training attempt. Always check the actual memory speed in Windows after a change.
Second, enabling ReBAR without Above 4G Decoding, or on a legacy boot setup. The toggle may appear to save, but the feature will not actually activate. Verify in the driver control panel or GPU-Z, not just in the BIOS menu.
Third, copying someone else’s PBO numbers, Curve Optimizer values, or memory timings. Every CPU sample is different. A value that is stable on one chip can crash on an identical model. Start from Auto or Enabled, and only tune further if you are willing to test thoroughly.
Fourth, changing power limits on a PC with weak cooling, then blaming the CPU when it throttles. Power limits and cooling are one system. Raise one without the other and you get heat, not speed.
Fifth, disabling every power saving feature at once in search of latency. This raises heat and noise, and it can hide the real cause of stutter, such as a background program, a driver problem, or a storage bottleneck.
Sixth, forgetting to re-enter settings after a BIOS update or CMOS reset. A BIOS update can reset XMP, ReBAR, boot order, and fan curves. After any update, check your key settings before you judge performance.
Frequently Asked Questions
I have 16GB single channel RAM. Is enabling XMP worth it?
Yes, enabling XMP is worth it, and this is a real question asked on Quora. A single stick still benefits from running at its rated speed instead of the slower default speed, because the CPU gets data faster. But XMP alone does not fix single channel itself. The stronger upgrade, when budget allows, is a matched pair of sticks in the correct dual channel slots, so you get both dual channel bandwidth and the rated speed. If you can only do one step today, enable XMP and verify the speed, then plan the second stick as a future upgrade.
Does the Intel Core i5-9400 have a resizeable bar option?
This is a real question asked on Quora, and the short answer is that support depends on the board and firmware, not just the CPU name. Older Intel platforms did not originally ship with Resizable BAR support, but some motherboard makers later added it through BIOS updates for certain boards. Check your exact board model and BIOS version on the maker’s support page, and check whether your graphics card and driver also support the feature. If any part of the chain lacks support, ReBAR will not activate, and that is not a setting you can force by toggling an option that does not exist.
Is Resizable Bar worth enabling on my Ryzen 5950X and RTX 3080 Ti?
This is a real question raised on Quora, and for that pairing the usual answer is yes, it is worth trying, with testing. A Ryzen 5000 series CPU and an RTX 3080 Ti are both in the supported generation for Resizable BAR, provided the board firmware and driver are current. Most supported games gain a small amount, a few gain more, and a small number gain nothing or slightly regress. Enable it, verify it is actually active, test your main games, and keep it on if your own results are neutral or better. Turn it off, or use a per game setting if your driver offers one, if a specific game gets worse.
What is the impact of a bottleneck on gaming performance?
This is a real question asked on Quora, and the answer depends on which part is limiting. A CPU bottleneck usually shows as stutter, lower 1 percent lows, and frame rates that do not improve much when you lower graphics settings, because the graphics card is waiting on the CPU. A GPU bottleneck usually shows as low frame rates that do improve when you lower resolution or graphics settings. BIOS settings help the CPU side by removing hidden limits on memory speed, boost behavior, and CPU to GPU transfers, but they cannot fix a graphics card that is simply too slow for the settings you chose. Diagnose first, tune second, and upgrade only when tuning shows the limit is hardware, not settings.
My PC crashes every time I enable XMP, please help. What should I do first?
This is a real question asked on the Tom’s Hardware forums, and the first step is to stop and revert to stability. Disable XMP, boot at default memory speed, and confirm the crashes stop. That proves the profile, not another part, is the trigger. Next, update the BIOS to a version with improved memory compatibility, check that the memory is in the correct slots, and try the profile again. If it still crashes, try the second profile if one exists, or a speed one step below the rated profile. If you run four sticks, test with two sticks to see if the board struggles with four at high speed. If none of those steps work, leave the default speed in place and consider a kit from the board maker’s qualified vendor list for your next upgrade. Stable memory is always better than fast memory that crashes.
Conclusion
The five BIOS settings in this guide are not magic, and they are not a replacement for a balanced PC. They are the settings most likely to be wrong on a gaming PC that was never tuned after assembly. Start with XMP or EXPO, because slow memory is the most common hidden limit. Add Resizable BAR when your hardware supports it. Consider PBO or a board boost setting only if you have cooling headroom. Check power limits when sustained clocks drop under load. Leave C-States alone unless you have measured a latency reason to touch them.
Change one setting at a time, measure frame time and 1 percent lows in your own games, and keep only what proves itself stable over days, not minutes. That disciplined approach is what turns BIOS tuning from guesswork into a real improvement, and it protects you from the most common failure: a PC that benchmarks well for an hour and crashes for a week.
If tuning shows your CPU is still the limit in the games you love, at the settings you actually use, then you have earned a clear upgrade decision, backed by data rather than a guess. Until then, these five settings are the cheapest performance work you can do, because you already own the hardware they unlock.

Leave a Reply