Introduction
Building a gaming PC in 2026 is easier than ever, even if you are a complete beginner. You don’t need years of hardware experience you just need to understand what each component does and how all the parts work together. A gaming PC is like a team where every part has an important job. The CPU handles instructions, the GPU creates game visuals, RAM helps with multitasking, storage keeps your games and files, and the power supply delivers energy to the entire system.
This gaming PC build 2026 guide will walk you through the complete process in simple language. You’ll learn how to choose the right PC parts, assemble your gaming computer step by step, install the operating system, optimize performance, and avoid common building mistakes.
By the end of this guide, you’ll know exactly how to build a powerful gaming PC in 2026 and create a setup that delivers smooth gameplay, better performance, and an amazing gaming experience.
What Is a Gaming PC?
A gaming PC is a computer built to handle games well. It runs games smoother than a regular office laptop, with better graphics, quicker load times, and higher frame rates. But it’s not only for gaming. People use the same gaming desktop for college work, video editing, streaming, watching movies, or just browsing the web.
The real benefit of building your own PC is choice. You pick exactly which parts go inside. You can keep things cheap and basic, aim for a solid mid-range setup, or go all out for a high-end machine, depending on your budget and the games you want to play.
Some people still buy pre-built computers, and that’s fine too. But a lot of gamers create gaming pc setups themselves because it usually saves money and lets them pick better parts than what most pre-built systems offer. A $900 pre-built PC often comes with a CPU and GPU that don’t really match each other, since the brand cuts corners on one to advertise a flashy spec on the other.
Why Build a Gaming PC in 2026?
Gaming PCs haven’t lost their appeal in 2026. Games keep getting heavier on hardware, with bigger worlds, more detailed textures, and ray tracing becoming the norm instead of a fancy extra. A regular computer struggles to keep up with that. When you build your own machine, you choose the CPU, GPU, RAM, storage, motherboard, case, and power supply yourself, instead of accepting whatever combination a manufacturer bundled together. This is the whole point of going the build my own pc route instead of settling for a boxed system.
There’s also the upgrade path. If a game starts chugging a year or two from now, you can swap in a new graphics card or add more memory without replacing the whole computer. That’s the real advantage of going DIY. The system grows with you instead of feeling outdated the moment a new game drops. A solid plan before you start buying parts saves you from costly mistakes. Think of this whole pc building guide as your roadmap from empty case to first boot.
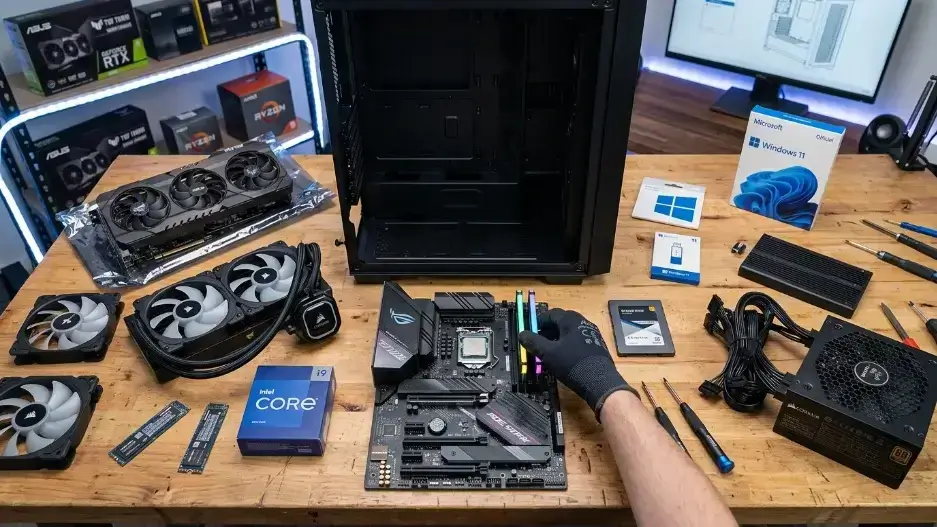
PC Parts Needed to Build a Gaming in 2026
Every gaming PC needs the same core set of PC components to function, no matter the budget. This computer build guide breaks each one down so nothing feels confusing.
Here’s what goes into a build, and the simple job each part does:
- CPU : the brain of the PC, handles all the thinking
- GPU : shows the game graphics on screen
- Motherboard : connects every other part together
- RAM : helps the PC work fast and multitask
- SSD or storage : saves your games and files
- Power supply : gives power to the whole PC
- Case : holds all the parts together
- Cooler : keeps the CPU from overheating
- Fans : move air inside the case
- Windows : the operating system that actually runs the PC
Miss even one of these computer components, and the PC either won’t boot or won’t be much fun to use. Keep this pc parts guide nearby while you shop, since matching parts correctly saves you returns later.
CPU: The Brain of the PC
The CPU handles instructions for everything happening on your PC, from launching a game to running browser tabs in the background.
For a first build, you don’t need the most expensive chip on the shelf. A solid current-generation Ryzen 5 or Intel Core i5/Core Ultra 5 handles most games fine at 1080p and 1440p, especially when your GPU is doing the heavy lifting. Getting this balance right is the core skill behind picking good gaming hardware. If you’re chasing every last frame in CPU-heavy games like Microsoft Flight Simulator or large-scale strategy titles, a higher-end X3D-cache Ryzen chip earns its price.
When picking a CPU, check the socket first, since it must match your motherboard exactly. Look at core count too, since more cores help when you’re multitasking or streaming. Clock speed affects how smooth games feel, and price obviously needs to fit your budget. Don’t ignore heat output either, since a hotter chip means you’ll need a better cooler to keep it running well.
The one rule you can’t skip: always match your CPU socket to your motherboard. Buy the wrong combination and the CPU simply won’t fit.
One thing beginner guides often skip: check how many PCIe lanes your CPU and motherboard combo gives your GPU and SSD. Some budget boards quietly cut down available lanes, which can slightly limit a fast NVMe drive even if everything technically works. I’ve seen builders spend extra on a Gen 4 SSD only to find their board runs it at Gen 3 speeds because of lane sharing with the GPU slot.
GPU: The Main Gaming Part
The GPU, also called the graphics card, decides how good your games actually look on screen. If smooth, sharp visuals matter to you, this is where most of your attention should go. For most builds, the GPU deserves the largest slice of your budget. A strong graphics card gives you higher settings, better frame rates, and visuals that hold up at higher resolutions.
By 2026, NVIDIA’s current lineup runs on its Blackwell architecture (the RTX 50 series), and AMD’s current lineup runs on RDNA 4 (the RX 9000 series). If you mostly play lighter titles like Minecraft, Valorant, Roblox, or Fortnite, a card like the RTX 5060 or RX 9060 XT will comfortably push past 100 FPS at 1080p. But if you’re chasing high settings in demanding AAA titles at 1440p, something closer to an RTX 5070 Ti or RX 9070 XT is where you start seeing consistent results.
| Gaming Type | GPU Need |
|---|---|
| 1080p simple gaming | Budget GPU (RTX 5060, RX 9060 XT) |
| 1440p gaming | Strong GPU (RTX 5070 Ti, RX 9070 XT) |
| 4K gaming | High-end GPU (RTX 5080) |
| Streaming and gaming | Strong GPU and CPU |
| 1080p high settings | Budget GPU (RTX 5060, RX 9060 XT) |
Match your GPU choice to your actual monitor. A 1080p monitor paired with a top-tier 4K graphics card just wastes money, since the extra power has nowhere to go.
Worth knowing in 2026: GPU memory (VRAM) has become a bigger deal than before. Newer games, especially titles on the latest game engines, push past 12GB of VRAM usage at 1440p with high-resolution textures. An 8GB card starts feeling limiting the moment ray tracing is turned on, while 16GB is the safer number to aim for if you don’t want to worry about this again for the next three or four years. Check the VRAM amount specifically, not just the model name, since some cards in the same family come in different VRAM versions, and those versions can behave very differently in newer titles once textures are maxed out.
Also worth knowing: GPU pricing has been unusually volatile in 2026 due to ongoing memory shortages, so treat any specific dollar figure as a rough guide rather than a fixed price. It’s worth comparing current prices before you buy rather than relying on older articles or even this one.
Also worth checking before you buy: most modern GPUs are physically longer than older ones, often 280mm to 340mm. Measure your case’s available GPU clearance before ordering, since this trips up more first-time builders than people expect.
Motherboard: The Main Board
The motherboard is the large board that almost everything else plugs into. Your CPU, RAM, storage, GPU, fans, and front panel cables all connect here in one way or another. It has to support your specific CPU and RAM type, or nothing else falls into place.
Before buying one, check that the CPU socket matches your chip, and that it supports your RAM type. Make sure the physical size fits your case, and check how many M.2 slots it has for storage. If wireless internet matters to you, look for built-in Wi-Fi. Count the USB ports too, since you’ll need enough for your keyboard, mouse, and other devices.
Don’t pick a motherboard just because the box looks sleek. Pick one that fits your other parts and gives you the ports and slots you’ll actually use.
RAM: The Short-Term Memory
RAM lets your PC keep multiple things running at once without choking. Run low on RAM and games stutter, browser tabs freeze, or apps take longer to respond. In 2026, 16GB still works for lighter games. But 32GB has become the more sensible default for most new builds, especially if you stream, record gameplay, or keep Discord and a dozen browser tabs open while playing.
| RAM Size | Best For |
|---|---|
| 8GB | Not good for new gaming PCs |
| 16GB | Basic gaming |
| 32GB | Best for most gamers |
| 64GB | Editing, streaming, heavy work |
If your budget allows, go with 32GB. It gives your system breathing room for games, background apps, and everyday multitasking.
Always buy RAM in matched pairs rather than a single stick. Two 8GB sticks running in dual channel mode can boost FPS by 20 to 50 percent over one 16GB stick in games that are sensitive to memory bandwidth, like open-world titles. This is one of the cheapest performance gains in the entire build and a lot of beginners miss it by grabbing a single large stick to save a few dollars.
Storage: Where Games Are Saved
Storage is where Windows, your games, and your files actually live. By 2026, there’s no real reason to build a gaming PC without an SSD. An SSD boots your PC quicker and cuts down loading screens noticeably compared to an old-style hard drive. A regular HDD reads around 80 to 160 MB per second. A basic SATA SSD jumps to roughly 550 MB per second. A modern NVMe Gen 4 drive can hit over 7,000 MB per second, which is the real reason Windows boots in 10 to 15 seconds instead of taking over a minute on an old hard drive.
A 500GB drive is usually too small for most gamers these days. 1TB is a solid starting point for a handful of big titles. 2TB suits most people comfortably, and if you’ve got a massive game library, 4TB gives you plenty of breathing room.
Go for an NVMe SSD if your motherboard supports it. It’s smaller, noticeably faster, and easy to install directly onto the board. One thing worth knowing: the newest PCIe 5.0 drives are extremely fast on paper, but they don’t actually load games any faster than a good PCIe 4.0 drive, since most games still aren’t built to take advantage of that extra speed. Save the money and put it toward your GPU instead.
Power Supply: The PC’s Power Source
The power supply unit, or PSU, feeds electricity to every part inside your case. It’s not exciting to shop for, but it’s not the place to cut corners. Avoid unknown or off-brand PSUs sold purely on low price. A poorly made power supply can cause crashes, shutdowns, or damage to your other components. Stick with a trusted brand, and make sure the wattage comfortably covers what your CPU and GPU need together.
| PC Type | PSU Range |
|---|---|
| Budget gaming PC | 550W to 650W |
| Mid-range gaming PC | 650W to 750W |
| Strong gaming PC | 750W to 850W |
| High-end gaming PC | 850W or more |
Always check your GPU’s actual power draw before settling on a wattage. High-end cards in 2026 can pull noticeably more power than older generations did.
If you’re buying one of the newer NVIDIA cards, pay close attention to the 12VHPWR power connector. There have been reports of this connector overheating when it isn’t pushed in all the way. Push it in until you hear it click, and double check it after your first long gaming session just to be safe.
PC Case: The Body of the PC
The case holds everything together and shapes how air moves through your PC. It’s easy to overlook, but it affects temperatures more than most beginners expect. A good case needs enough internal space, room for fans, and a layout that allows air to flow freely. Don’t pick a case purely because it looks good. A stylish case with poor airflow can quietly bake your other parts over time.
Make sure the size actually fits your motherboard, and double check there’s enough room for your graphics card’s length. Good fan support helps cooling, while extra space behind the motherboard tray makes cable management much easier. Airflow ties all of this together and is what actually keeps your parts cool. A plain case with great airflow will outperform a flashy one that traps heat, every time.
Cooling and Fans
Every part inside your PC generates heat while it works. Cooling keeps that heat from becoming a problem. The CPU needs a dedicated cooler. Some chips come with a basic one included. Others expect you to buy one separately.
Case fans matter too. They pull cool air in and push the warm air building up inside back out. Front fans bring cool air in, while rear and top fans push the hot air back out. This simple in-front, out-the-back airflow pattern is all most builds really need.
You don’t need liquid cooling for a first build. A decent air cooler handles most CPUs without trouble, and swapping a stock cooler for a midrange air cooler or a 240mm AIO can drop CPU temperatures by 15 to 25 degrees Celsius, which matters more than people expect once a CPU starts thermal throttling.
Aim to keep your CPU under 85°C and your GPU under 83°C while gaming. Past that, both parts start slowing themselves down automatically to protect against damage, and you lose performance without any obvious warning. Cooling rarely gets the spotlight in a hardware guide, but it quietly decides how long your other parts last
Build a Gaming PC 2026 Budget Plan
Set your budget before you open a single shopping tab. This one habit alone prevents most of the overspending beginners run into, no matter which best pc build 2026 route you’re going for.
A budget of $700 to $900 gets you a basic 1080p setup, and makes a good starter gaming pc for new builders. Push that to $1000 to $1300 and you’re looking at solid 1080p performance with some 1440p headroom. Between $1500 and $2000 buys you strong 1440p gaming, and $2500 or more puts 4K and high-end gaming within reach. GPU prices have moved around a lot in 2026, so treat these ranges as a starting point and check current prices before locking in a budget.
If you’re putting together your first entry level gaming pc, don’t feel pressure to max out every part right away. Get the GPU right first, since that’s what most of your gaming experience depends on. After that, pick a CPU that won’t hold it back, get enough RAM, fast storage, and a power supply you can trust. A common mistake at this budget is spending $50 extra on RGB fans and a tempered glass panel, then having to settle for a weaker GPU. The visuals on your screen matter a lot more than the visuals on your desk.
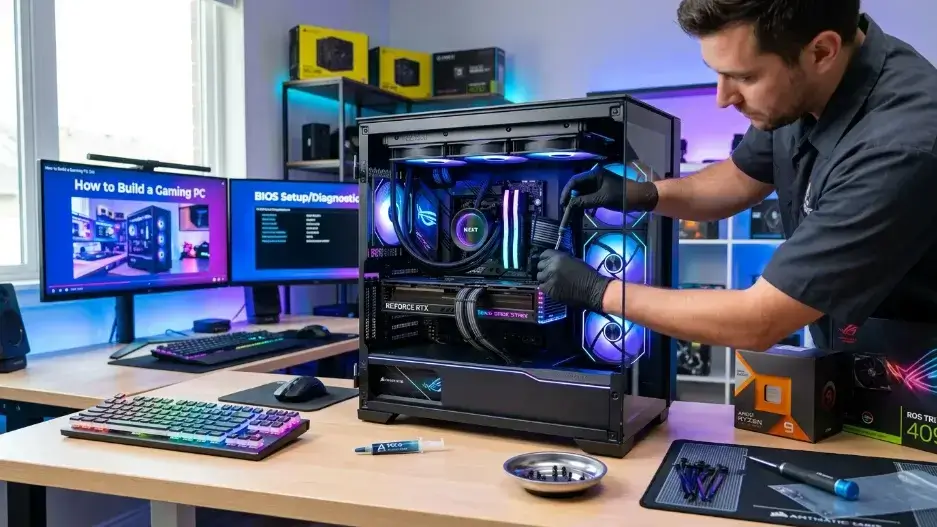
Gaming PC Assembly Guide Step by Step
Time to actually build the thing. Consider this section the heart of the entire gaming pc assembly process, since everything before this was just planning. Before starting, skim the manuals that came with your motherboard and case. Keep every screw sorted instead of scattered. Work somewhere clean and flat, and don’t rush.
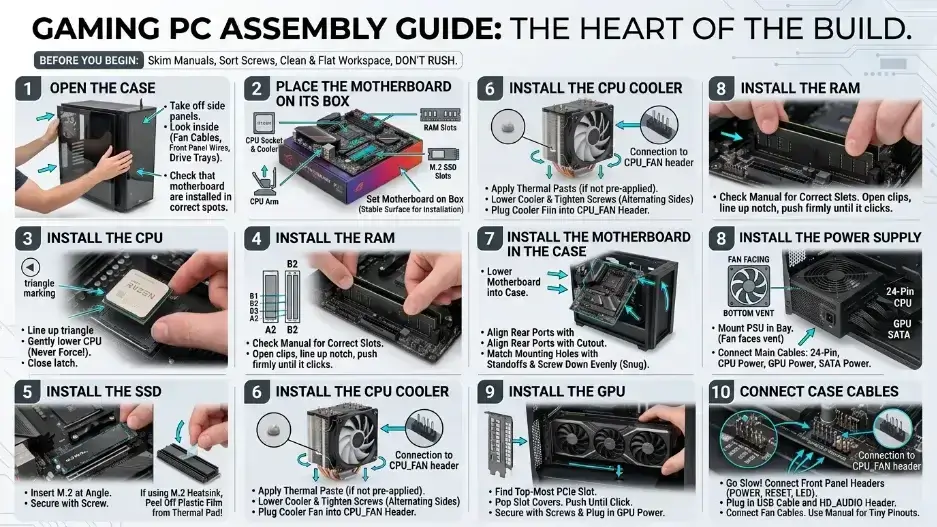
Step 1: Open the Case
Take off both side panels and set the screws aside. Look inside and get familiar with what’s there: fan cables, front panel wires, drive trays. Check that the case already has motherboard standoffs installed in the correct spots. These small metal pieces stop the motherboard from touching bare metal and short-circuiting.
Step 2: Place the Motherboard on Its Box
Don’t drop the motherboard into the case yet. Set it on top of its own cardboard box first. This gives you a flat, stable surface to install the CPU, RAM, SSD, and cooler without anything wobbling.
Step 3: Install the CPU
Open the CPU socket on the motherboard. Look for a small triangle marking on both the CPU and the socket. Line those triangles up and lower the CPU gently into place. Never force it down. A correctly aligned CPU drops in with almost no pressure needed.
Close the latch once it’s seated.
Step 4: Install the RAM
Check your motherboard manual for which slots to use. This matters more than people think. If you’re running two sticks, the common setup is slots 2 and 4, but this varies by board, so confirm it instead of guessing. Open the clips, line up the notch, and push the stick down firmly until it clicks into place on both sides.
Step 5: Install the SSD
Locate the M.2 slot. Remove the small screw or plastic standoff covering it. Insert the SSD at a slight angle, press it down flat, and secure it with the screw. If your board includes a heatsink for the M.2 slot, peel off the plastic film from the thermal pad before reattaching it. This step gets missed constantly.
Step 6: Install the CPU Cooler
If your cooler already has thermal paste pre-applied, skip buying separate paste. If not, add a small pea-sized dot in the center of the CPU. Lower the cooler into place and tighten the screws gradually, alternating sides instead of fully tightening one corner first.
Plug the cooler’s fan cable into the header labeled CPU_FAN. Don’t skip this. A cooler running without its fan plugged in can trigger an error on boot or let temperatures climb fast.
Step 7: Install the Motherboard in the Case
Lower the motherboard into the case. Line up the rear ports with the cutout on the case, and match the mounting holes with the standoffs underneath. Screw it down evenly. Snug is enough, no need to crank the screws hard.
Step 8: Install the Power Supply
Mount the PSU in its bay, usually at the bottom in modern cases. Check which way the fan faces. If your case has a bottom vent, point the fan toward it. Screw the PSU into place, then connect the main cables. The 24-pin cable goes to the motherboard, while the CPU power cable connects near the top of the board. The GPU power cable runs to your graphics card, and SATA power cables go to any extra drives or fan hubs you’re using.
Step 9: Install the GPU
Find the top-most long PCIe slot. Pop out the metal slot covers on the back of the case that line up with where the card will sit. Line the GPU up with the slot and push down firmly until it clicks. Secure it to the case with screws, then plug in the GPU power cable.
Step 10: Connect Case Cables
This step trips up almost every first-time builder, so go slow. The power switch, reset switch, and power LED all connect to the front panel header. The USB cable plugs into a dedicated USB header, while the audio cable goes into the HD_AUDIO header. Fan cables connect to the fan headers scattered around the board. Keep the manual open here. The front panel pins are usually labeled, but they’re tiny and easy to mix up.
Build a Gaming PC Cable Management
Cable management means keeping your wires tidy instead of letting them pile up loosely.
Tidy cables help airflow and make future upgrades easier.
- Keep cables clear of fan blades.
- Route what you can behind the motherboard tray.
- Use zip ties or Velcro straps.
- Don’t pull any cable so tight it strains the connector.
- Keep the GPU power cable resting naturally, not bent sharply.
- Avoid letting thick bundles block airflow paths.
Your first attempt won’t look picture-perfect, and that’s fine. Clean and safe matters more than pretty.
First Boot
Time to power it on. Before you press that button, quickly run through this checklist:
- CPU cooler connected
- RAM clicked in place
- GPU installed
- GPU power connected
- 24-pin cable connected
- CPU power cable connected
- Monitor connected to GPU
- Keyboard connected
- Power cable connected
- PSU switch turned on
Now press the power button. The very first boot sometimes takes longer than usual, especially with brand new RAM that needs a moment to initialize. Don’t panic if the screen stays blank for a minute. If you reach the BIOS screen, that’s a good sign everything is connecting properly.
BIOS Setup
BIOS is the first screen your motherboard shows before Windows loads. It’s where you confirm your parts are recognized correctly. Check that the CPU name shows up correctly, the RAM amount matches what you installed, and your SSD storage is showing up. Glance at CPU temperature while idle, and confirm fan speeds are registering too.
Then turn on XMP (Intel) or EXPO (AMD) to let your RAM run at its rated speed instead of a slower default. Skipping this step is one of the most common mistakes I see, since it leaves a decent RAM kit running well below the speed it was actually sold at, sometimes a 10 percent FPS difference for literally zero cost. After that, set your USB installer as the first boot device if you’re installing Windows for the first time. Save your settings and let the PC restart.
Install Windows and Drivers
You’ll need an operating system. Most gamers go with Windows 11. Use a separate computer to create a Windows installer on a USB drive. Plug that into your new build, power it on, and follow the setup.
Once Windows is installed, move on to drivers. Start with the chipset driver, since it helps your motherboard and CPU work well together. Install the GPU driver next so games run properly, followed by your Wi-Fi or LAN driver for internet access, and finally the audio driver for sound. Resist the urge to install a pile of extra software right away. Stick to what you actually need.
Testing Your Gaming PC
Once everything boots and Windows is set up, it’s testing time. Don’t jump into hours of gaming without checking a few things first.
Check Temperatures
Install a free temperature monitoring app like HWMonitor or MSI Afterburner and watch CPU and GPU readings. If your CPU spikes unusually fast, shut down and check the cooler mounting.
Test a Game
Launch something you play often. Watch the frame rate and listen for odd fan noise. Smooth gameplay with steady frame rates is what you want to see.
Test RAM
If the system crashes or randomly restarts, RAM is often the culprit. Sometimes a stick isn’t fully seated. Sometimes the XMP/EXPO speed isn’t stable for that kit, and dialing it back one notch fixes it. Running the free tool MemTest86 overnight is a reliable way to catch RAM errors that don’t show up right away.
Test Storage
Confirm your SSD shows up correctly inside Windows, with the full capacity you expected.
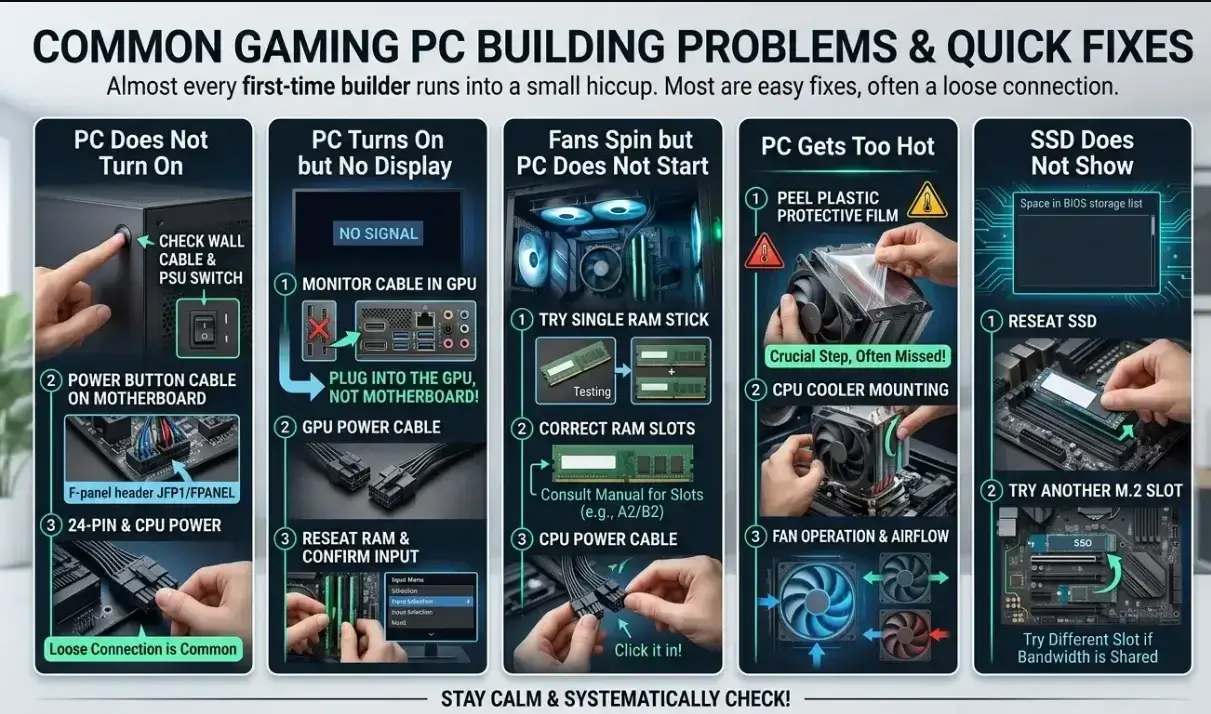
Build a Gaming PC Common Problems & Fixes
Almost every first-time builder runs into at least one small hiccup. Most fixes are quick, and most of them come down to one loose connection somewhere in the build.
PC Does Not Turn On
Check the wall power cable, then the PSU’s physical switch on the back, then the power button cable on the motherboard. Also double check the 24-pin and CPU power cables, since a loose connection here is common.
PC Turns On but No Display
This is probably the most common issue. Make sure your monitor cable is plugged into the GPU’s port, not the motherboard’s built-in output. Also recheck the GPU power cable, reseat the RAM, and confirm the monitor’s input source.
Fans Spin but PC Does Not Start
Try booting with just one RAM stick, then test the other separately. Confirm it’s in the slot your manual recommends. Also verify the CPU power cable is fully clicked in, not just resting in the socket.
PC Gets Too Hot
Check the CPU cooler mounting. Make sure the plastic protective film was actually peeled off, this gets missed more often than you’d think. Confirm the CPU fan is spinning and case fans are moving air in the right direction.
SSD Does Not Show
Reseat the SSD in its M.2 slot. If your board has more than one M.2 slot, try the other one, since some slots share bandwidth with other components and can behave oddly.
Build a Gaming PC Beginner Mistakes to Avoid
A few mistakes show up again and again with new builders, and most of them are easy to dodge once you know the easy pc build habits that prevent them.
New builders often make small mistakes that can affect performance, compatibility, and the overall gaming experience. Avoid these common errors:
- Buying Incompatible Parts Always check compatibility between your CPU, motherboard, RAM, GPU, case, cooler, and power supply before purchasing.
- Spending Too Much on RGB and Looks RGB lighting can make your setup look better, but it does not increase FPS. Spend your budget on performance parts like the GPU and CPU first.
- Forgetting the CPU Power Cable The motherboard’s 24-pin cable is not enough. Make sure to connect the separate 4-pin or 8-pin CPU power cable near the top of the motherboard.
- Plugging the Monitor Into the Wrong Port If you have a dedicated graphics card, connect your monitor to the GPU ports, not the motherboard ports.
- Not Enabling XMP or EXPO Your RAM may run slower than its advertised speed. Enable XMP/EXPO in BIOS to get the full RAM performance.
- Poor Cable Management Messy cables can restrict airflow and increase temperatures. Keep cables organized for better cooling.
- Skipping Final Testing After building, test temperatures, check drivers, and make sure all components are working properly before gaming.
Before calling your build finished, do one last bottleneck check. Load up your favorite game and watch your CPU usage, GPU usage, RAM usage, and temperatures while you play. If everything checks out, your gaming pc build for beginners is officially done. Now go enjoy the machine you built with your own hands.
Bottleneck Check Final Step Before You Finish
A bottleneck happens when one part holds back the performance of another. Say you’ve got a powerful GPU paired with a weak, outdated CPU. That GPU won’t hit its full potential because the CPU can’t feed it instructions fast enough. The reverse causes problems too: a strong CPU with a weak GPU still leaves you with sluggish gameplay.
This is why checking for bottlenecks matters once your build is finished and running.
How to Check for a Bottleneck
Launch a game and watch your CPU and GPU usage while playing, using Task Manager (Ctrl + Shift + Esc) or a free tool like MSI Afterburner.
| What You See | What It Means |
|---|---|
| GPU near 95% to 100% | Normal for gaming |
| CPU always at 100% | CPU may be holding back |
| GPU low and FPS low | Possible CPU bottleneck |
| RAM full | Need more RAM |
| SSD full | Need more storage |
One thing worth knowing: in games like Fortnite, Warzone, or Cities: Skylines, the bottleneck can shift between your CPU and GPU depending on what’s happening on screen. Check usage in a busy moment, like a crowded match or a big city, not while sitting in a menu. Menu numbers are almost always misleading. Small bottlenecks exist in basically every PC. You only need to fix something if it’s noticeably hurting your gameplay.
If your CPU is too weak, try lowering background apps first before spending money on an upgrade. A weak GPU usually means lowering your graphics settings, or eventually upgrading the card itself. Low RAM has a simple fix: add more. Slow storage means it’s time for an SSD if you haven’t made the switch yet, and high heat almost always comes down to improving your cooling setup.
Figure out which part is actually causing the slowdown before spending money on an upgrade. Guessing wrong wastes cash you could’ve spent better elsewhere. Once you know exactly which part is limiting you, a bottleneck calculator can help confirm it before you spend a single dollar on an upgrade.
Build a Gaming PC Tips
Dust buildup is the quiet enemy of every PC. Clean your fans and filters every few months, and your temperatures will stay noticeably lower over time. These small habits matter just as much as any advice you’ll read about choosing parts. Update GPU drivers when a new game or driver release calls for it. You don’t need to chase every single update the moment it drops.
Leave some breathing room on your SSD instead of filling it to the brim, since a nearly full drive tends to slow down once it passes around 85 to 90 percent capacity. Plug your PC into a proper surge protector, and never move it while it’s powered on.
If this is your first time building a PC, don’t rush. A careful build that takes a weekend beats a rushed one finished in an afternoon with mistakes baked in. Read through the manuals. Pay attention to where every cable goes. Double check connections before you hit that power button the first time. These tips apply whether this is your first build or your fifth.
Your first build probably won’t look magazine-perfect, and that’s normal. The real goal is a PC that’s safe, stable, and works the way you need it to. A genuinely useful guide doesn’t stop at assembly. It also covers testing things properly, keeping temperatures in check, and making sure your parts work well together instead of fighting each other.
Once your PC boots, Windows installs cleanly, drivers load without errors, and your games run smooth, you’ve done it.
Frequently Asked Questions
How much does it cost to build a gaming PC in 2026?
A basic 1080p gaming PC costs around $700 to $900. A strong 1440p build runs $1500 to $2000. High-end 4K setups go past $2500. The GPU usually takes the biggest share of any budget, and prices have been volatile in 2026 due to memory shortages, so check current pricing before you commit.
What parts do I need to build a gaming PC?
You need a CPU, GPU, motherboard, RAM, storage (SSD), power supply, case, cooler, and case fans. Windows is also required to actually use the PC once it’s built.
Is it cheaper to build a gaming PC than buy one?
Usually yes. Building lets you pick exactly which parts go in, so you’re not paying for a mismatched CPU and GPU combo that pre-built brands often bundle to hit a price point.
How long does it take to build a gaming PC?
Most first-time builders finish in 3 to 5 hours, including cable management. Experienced builders often do it in under 90 minutes.
What is a bottleneck in a gaming PC?
A bottleneck happens when one part, usually the CPU or GPU, holds back the performance of the other. You can spot it by checking CPU and GPU usage in Task Manager while gaming.
Do I need 16GB or 32GB of RAM for gaming in 2026?
16GB still works for lighter games. 32GB is the safer choice for most builds in 2026, especially if you stream, record, or multitask while playing.
Conclusion
Building your own gaming PC gives you full control over performance, budget, and future upgrades. Instead of relying on pre-built systems, you choose each component based on your gaming needs, ensuring better value and efficiency. From selecting the right CPU and GPU to assembling and optimizing your system, every step contributes to a smoother gaming experience.
Once your system is built, tested, and properly configured, you unlock a machine that is faster, more powerful, and tailored specifically for you. The key is patience, correct part selection, and careful assembly. When done right, your gaming PC becomes a long-term investment that grows with your gaming journey.
Leave a Reply