
How to Upgrade Your PC in 2026 (Quick Answer)
Run HWInfo64 while you game or render, and watch two numbers: GPU core usage and single-core CPU load. If your GPU sits at 95 to 100%, a new graphics card will help pair it with a native ATX 3.1 power supply. If one CPU core pins at 100% while the GPU idles below 90%, the processor is your ceiling, and no graphics card will fix that until you move to a newer AMD AM5 or Intel LGA1851 platform. And when you buy new DDR5 memory, install two sticks, not four four sticks under high frequency profiles is the single most common reason DDR5 kits refuse to run at their rated speed.
PC Upgrade Guide
Upgrading used to be simple. You bought a faster card, dropped it in, and watched your frame counter climb. That’s not quite how it works anymore. Today’s components talk to each other in ways that weren’t true five years ago. Pair a new GPU with the wrong chipset and you can lose real bandwidth without ever seeing an error message. Fill every RAM slot on your board and some systems won’t even post. This guide walks through the diagnostics, the platform choices, and the small decisions that end up mattering a lot more than they should so you spend money on the part that’s actually holding you back.
Find Your Real Bottleneck First
Don’t guess. Before you spend a dollar, open a free monitoring tool HWInfo64, MSI Afterburner, or CapFrameX all work well and watch your hardware while it’s under real load. Launch the game or app you actually use, not a synthetic benchmark, and let it run for a few minutes.
GPU Core Usage vs VRAM Depletion
Watch your graphics card while you play. If core utilization holds between 95% and 100%, your GPU is the limiting factor, and a faster card will give you a real, noticeable jump.
But keep an eye on VRAM too. If memory usage maxes out and GPU core usage suddenly drops at the same time, you’ve run out of video memory, not compute power. That’s a different problem: your system starts pulling texture data through system RAM instead, and the result is the kind of stuttering that feels like a settings problem but isn’t. A card with more VRAM not necessarily more raw power is what fixes this.
Finding a Hidden Single-Core Bottleneck
Total CPU usage is a misleading number. Seeing 30% overall load doesn’t mean your processor has headroom, because most games and engines lean hard on one or two cores for physics, AI, and game logic while the rest sit mostly idle.
Open the per-core breakdown in HWInfo64 instead of the overview graph. If one core is pinned at 100% while your GPU usage drifts below 90%, your CPU can’t feed the graphics card fast enough. In that case, a new GPU won’t move the needle you need a faster processor first.
Common mistake: builders see 8 cores at only 40% average and rule out the CPU. Check the individual cores, not the average that’s where the real bottleneck hides.
Practical Takeaway: Run live diagnostics under real workloads before buying anything. It takes ten minutes and can save you from an upgrade that does nothing.
Choosing the Right CPU, Motherboard & RAM
If your diagnostics point to the platform itself, you’re choosing between two well-supported ecosystems.
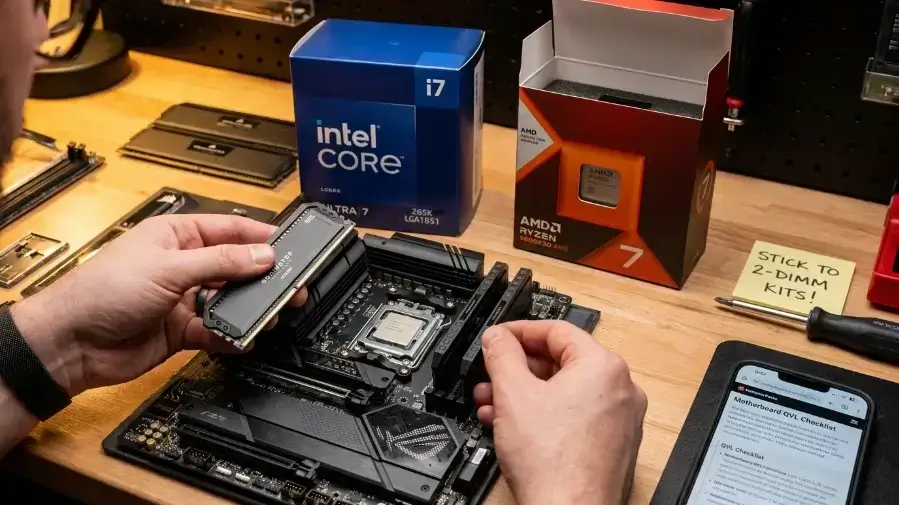
Intel LGA1851 vs AMD AM5
- AMD AM5 hosts chips like the Ryzen 7 9800X3D, which uses AMD’s large 3D V-Cache to give it a clear edge in gaming frame rates, especially minimum frame rates in CPU-heavy titles. AMD has kept AM5 alive across several CPU generations already, so it’s the safer bet if you plan to swap in a faster chip down the line without a new motherboard.
- Intel LGA1851 hosts the Core Ultra 7 265K, which trades some single-threaded gaming edge for stronger multi-core throughput useful for video editing, rendering, or running local AI models, since these chips include a dedicated NPU. If gaming is your only goal, AM5 with an X3D chip is generally the stronger pick; if you split time between gaming and heavier productivity work, the Intel platform closes the gap.
The 4-Stick Stability Trap
It’s tempting to fill all four RAM slots maybe to hit a capacity number, maybe to reuse old sticks. Don’t, if you care about running at rated speed. High-frequency DDR5 puts a real electrical load on the memory controller. Populate all four slots with fast DIMMs and many boards will automatically step down the speed sometimes from something like 6400MHz down to 4200MHz to avoid instability and crashes. For maximum capacity and full rated speed, buy a matched two-stick kit instead of four smaller sticks.
Pro tip: check your motherboard’s Qualified Vendor List (QVL) before buying RAM. Even a two-stick kit can fail to hit its rated speed if it isn’t validated for your specific board.
What Is CUDIMM?
CUDIMM (Clocked Unbuffered DIMM) is a newer DDR5 module design with a small clock driver built onto the stick itself. That driver cleans up the signal at very high frequencies, which is how some CUDIMM kits push stably past 8000MHz on supported boards something standard UDIMMs generally can’t do as reliably.
Practical Takeaway: Pick a platform with a real upgrade runway ahead of it, and stick with a two-DIMM kit rather than four.
PCIe Lane Sharing What Actually Slows You Down
Every component on your board shares a limited number of high-speed data pathways PCIe lanes. Get this wrong and you can quietly cut your own GPU’s bandwidth in half.
Understanding Chipset Constraints
Higher-tier chipsets like Intel Z890 and AMD X870E offer more independent, dedicated lanes. Mid-range boards like Intel B860 and AMD B850 have fewer lanes to go around, so more components end up sharing the same pathways.
How a Storage Drive Can Slow Down Your Graphics Card
Your primary PCIe slot is normally wired for a full x16 connection straight to the CPU. But PCIe 5.0 SSDs are bandwidth-hungry, and many mid-range boards simply don’t have enough spare lanes to run a Gen 5 SSD and a full x16 GPU slot at the same time.
The result: install a PCIe 5.0 SSD in the “wrong” slot on one of these boards, and the primary GPU slot can drop to x8. In real gaming benchmarks, the difference between x16 and x8 on a Gen 5 card is usually small a few percent at most but it’s not zero, and it’s an easy way to leave performance on the table for no reason. Always check your motherboard manual’s block diagram before populating a second M.2 slot, since exactly which slots share lanes varies by board and even by revision.
Practical Takeaway: Read your motherboard’s lane-sharing diagram before adding a second high-speed SSD, so it doesn’t quietly steal bandwidth from your GPU.
Power Protocols Power Delivery & Structural Safety
Modern GPUs draw serious power in short, sharp spikes, which makes PSU choice more than a wattage math problem.
The ATX 3.1 Standard
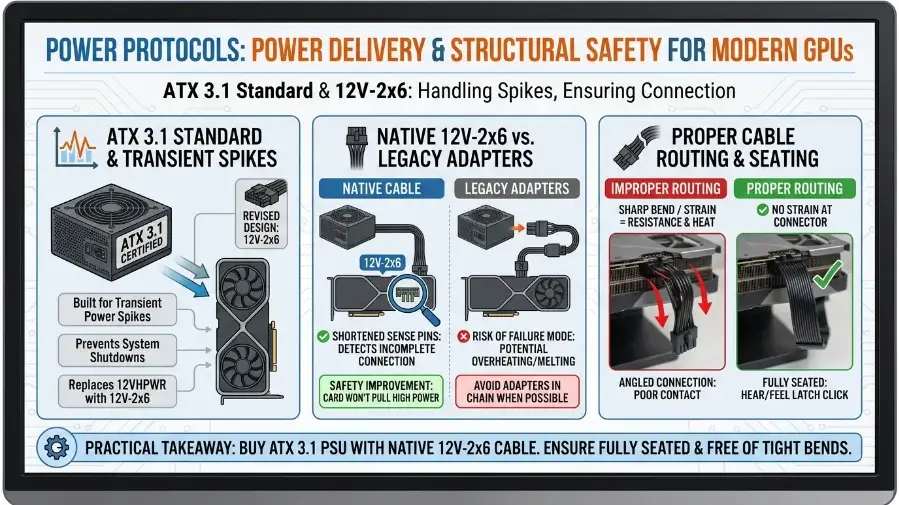
ATX 3.1 is the current power supply standard built to handle these transient spikes without tripping protections or shutting the system down mid-game. It replaces the earlier 12VHPWR connector with a revised design called 12V-2×6.
Native 12V-2×6 Cables vs Legacy Adapters
Skip 8-pin-to-16-pin adapters where you can. The safety improvement in 12V-2×6 comes from shortened sense pins: if the connector isn’t fully seated, the card detects the incomplete connection and won’t pull high power through it, which is exactly the failure mode that caused overheating and melting on some earlier 12VHPWR cables. A native cable from an ATX 3.1 power supply gives you this protection directly, without an adapter in the chain.
Worth knowing: even with a proper 12V-2×6 connection, a cable that’s still bent sharply right at the connector, or plugged in at an angle, can build up resistance and heat over time. Route the cable so it isn’t under strain right where it meets the card, and reseat it firmly enough to hear or feel the latch click.
Practical Takeaway: Buy an ATX 3.1-certified PSU with a native 12V-2×6 cable, and make sure that cable is fully seated and free of tight bends.
Enclosure Checklists Will It Actually Fit In Your Case?
Check your case before you check your cart.
Component clearance checklist:
- Graphics card length : measure from the back of the case to the front fan mounts. Some enthusiast cards now stretch close to 350mm.
- Graphics card thickness : many current cards take up three or four expansion slots, which can block lower PCIe or M.2 connectors on your board.
- CPU cooler height : check your case spec sheet for maximum cooler height so a tall air cooler doesn’t hit the side panel.
- RAM clearance : tall heatsinks on RGB memory can interfere with a large air cooler’s fan or a top-mounted radiator. Check your cooler manufacturer’s compatibility list if you’re running both.
Back-Connect Motherboards
If you’re building a new case and board together, back-connect designs like ASUS BTF or MSI Project Zero move power and fan headers to the rear of the board. That keeps the main chamber cleaner, simplifies cabling, and can improve airflow though it does mean committing to a case built to support the layout, so check compatibility before you buy either part separately.
Practical Takeaway: Measure your case with a tape measure, not a guess, before ordering a new GPU or cooler.
Installation & Fixing a Dead Boot
Update Your BIOS Before Swapping CPUs
If you’re keeping your current motherboard and installing a new-generation processor, update the BIOS first, while your old, working CPU is still installed. Skip this step and the board may not recognize the new chip at all, leaving you with a black screen and no obvious cause. Download the latest firmware from your motherboard maker’s official support page, put it on a formatted USB drive, and flash it from the BIOS menu before you touch the CPU.
What until both latches click. If you’re running two sticks, check your manual for the correct dual-channel slots this varies by board, so don’t assume it’s always slots 2 and 4.
Clear the CMOS. Unplug the PSU from the wall, remove the small coin-cell battery from to Do When Your System Won’t POST
If the power comes on but the screen stays black:
- Check the debug LEDs. Most modern boards have small indicator lights near the CPU socket labeled CPU, DRAM, VGA, or BOOT. Whichever one stays lit tells you where to start looking.
- Reseat your RAM. Power off completely, pull the sticks, and press them firmly back in the board for about five minutes, then reinstall it and reboot. This resets BIOS settings to factory defaults, which fixes a surprising number of “dead” boards caused by an aggressive overclock or bad XMP profile.
Practical Takeaway: Flash your BIOS with the old CPU still installed it’s the single most common thing people skip before a processor upgrade.
Key Hardware Component Comparisons
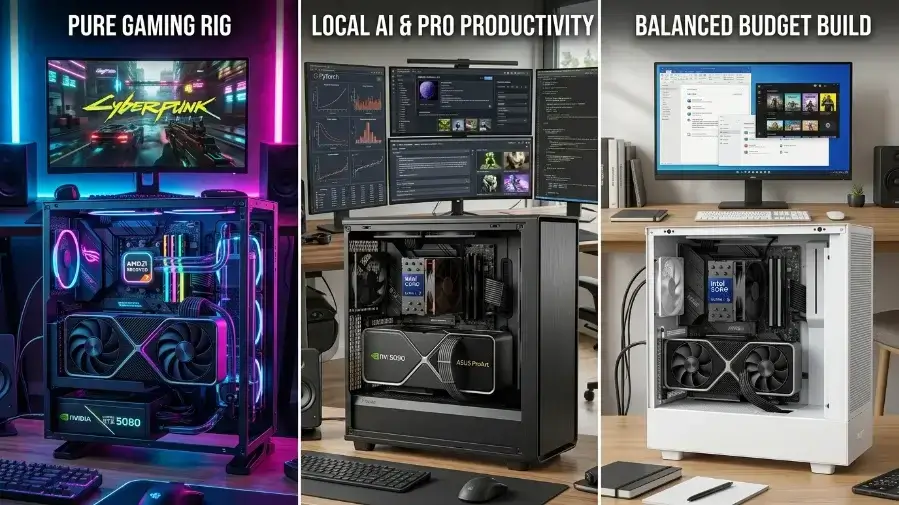
To align your upgrade goals with your budget and workload, follow these tier-based component recommendations:
Pure Gaming Focus Setup
- Best CPU Choice: AMD Ryzen 7 9800X3D
- Best GPU Choice: NVIDIA RTX 5070 Ti or RTX 5080 (Both cards ship with 16GB of VRAM)
- Power Target: 750W–850W ATX 3.1 certified power supply
Local AI & Pro Productivity Setup
- Best CPU Choice: Intel Core Ultra 7 265K
- Best GPU Choice: NVIDIA RTX 5090 (Features a massive 32GB of VRAM, which is the real reason it dominates local Artificial Intelligence and deep learning workloads over pure gaming cards)
- Power Target: 1000W+ ATX 3.1 native power supply
Balanced Budget Build Setup
- Best CPU Choice: Intel Core Ultra 5 245K
- Best GPU Choice: AMD RX 9070 XT or NVIDIA RTX 5070
- Power Target: 650W–750W ATX 3.1 certified power supply
Common Upgrade Mistakes to Avoid
- Buying Four RAM Sticks: This layout forces your internal memory controller to run significantly slower to maintain electrical stability. Always buy a matched two-stick kit instead.
- Skipping the PSU Upgrade: Pairing a modern, power-hungry graphics card with an older ATX 3.0 power supply increases your risk of system shutdowns under sudden performance loads. If you must use a temporary adapter, ensure it is the official one that shipped with your graphics card.
- Ignoring Lane-Sharing on Mid-Range Boards: Placing a secondary Gen 5 SSD into the wrong storage slot can accidentally trigger motherboard lane-splitting, dropping your primary graphics card slot speed from x16 down to x8.
Key Takeaways
- Run live diagnostics under real workloads before buying anything it’s the only way to know what’s actually limiting you.
- Stick to a two-stick DDR5 kit for full rated speed.
- Use a native ATX 3.1 power supply with a 12V-2×6 cable, seated fully and free of sharp bends.
- Check your motherboard’s lane-sharing layout before adding a second high-speed SSD.
Frequently Asked Questions
How do I know if my low frames are caused by my CPU or my GPU?
Open MSI Afterburner while running a demanding game. If GPU core usage sits above 95%, the GPU is your limit. If GPU usage drops below 90% while a single CPU core sits at 100%, the CPU is holding you back instead.
Will a PCIe 5.0 M.2 SSD slow down my graphics card?
It can, on mid-range chipsets like Intel B860 or AMD B850, where components often share lanes. A Gen 5 SSD in a shared slot can drop your GPU slot to x8. Higher-tier boards like Z890 or X870E generally give the GPU and a Gen 5 SSD independent lanes, avoiding the tradeoff — but always confirm with your specific board’s manual, since lane layouts differ by model.
Why won’t my system hold a stable EXPO or XMP profile?
This is most often tied to running four RAM sticks instead of two. High-frequency DDR5 profiles are validated and marketed around two-DIMM configurations. Check your manual for which two slots your board wants populated, and confirm your specific kit is on the board’s QVL.
Conclusion
A good upgrade comes down to balance: know what’s actually bottlenecking your system, understand how your motherboard shares power and bandwidth, and measure your case before you order anything. Diagnose first, flash your BIOS early, and the rest of the build tends to go smoothly.
Not sure if your case has room, or whether your PSU can handle your next GPU? Share your current specs and target upgrade in the comments, and the community can help you map it out.

Leave a Reply